

How to reply back to tickets?
When a client submits you a query, it lands in the staff portal as an incident. This incident has a unique incident hash which helps to keep a track. When an incident is raised in the system, it can be assigned to a staff member. This staff member goes through the query and responds back to the client within the stipulated time period. This time period is defined by the SLA applied to the incident.
When a staff member logs in the system through his staff login, he will be able to view the number of tickets assigned to him on the dashboard itself. When the staff opens a ticket, a client query can be seen displayed under the conversation tab. As an SLA will be applied, the staff member needs to respond back to the client within the time frame or else the ticket will be overdue or the issue will be escalated.
Using role access you can modify access rights of all the roles created in the system. You can choose to update the roles created in the system, for example the role of staff can be updated through admin settings>user>role>staff>update role. Here, to make sure your staff can respond back to client queries, you should allow permission to reply/reply all incidents.
The client’s query can be seen under the conversation tab as a post. On the top right corner of the post, you will find a reply icon

along with a drop down option. This drop down option enlists various operations that can be performed on a ticket.

A content box appears where you can also find all the previous conversation that took place between you and the client, hence this option is called ‘reply with quote’. Using this option you can add your inputs and respond back to the client. When you click on this reply option from the drop down list of operations, a content box appears on the screen. The recipient is by default the client who has raised the query. You may also choose to add recipients in the Bcc and Cc list.
You may also choose to revert back to the client query using the reply option from the top of the screen. Here, you can see two options to revert back, reply and reply all.

Using the reply option from the drop down list you can reply back to the client without quote. A fresh response can be drafted from this option where no previous quotes will be included. While submitting the ticket, if the client has added other contact email addresses as CC, using reply all option you can make sure the response is also received by all the elements who are also a part of this conversation.
In the content area you may choose to edit the post before sending it. You can perform various tasks such as editing, linking, adding attachments to the post, etc before sending it.

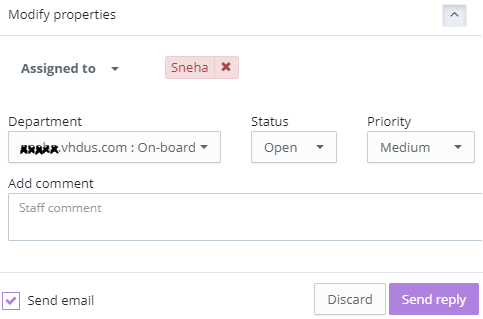
Before sending the message you may also choose to modify its properties. The drop down button on the far right gives access to update properties such as assignment of the ticket, changing the department, status and priority as well as it allows the staff to add a comment on the ticket which will not be visible to the client.
After updating properties, the checkbox allows you to decide whether to send an email to the client or not. If you change your mind you can also choose to discard the message or you may proceed with it and send the reply. You can also save your reply as a solution i.e. your reply would be added as a solution article and you can use the same in future when you are catering to a similar kind of issue. You can also use macro i.e. canned responses while replying to a ticket.