Asset Management refers to the documentation of the Assets of the organization. You can store the details of both the tangible and intangible assets.
You can add the assets one by one by clicking on the option on the top right corner of the page.
You can also import the list of assets if you have the same in a CSV format.
In the V5 version, we also introduced the option of Auto-discovery of Assets from the network.
Options on the left side of the Asset Management page:
IT Assets
The IT assets would be categorized under as workstation, desktop, laptop or mobiles.
Workstation: This would include a list of all the Workstations stored in the Asset Management section of the Service Desk. This would be further classified as Desktops, Laptops and Mobiles.
Desktops: This would include a list of all the Desktops stored in the Asset Management section of the Service Desk.
Laptops: This would include a list of all the Laptops stored in the Asset Management section of the Service Desk.
Mobiles: This would include a list of all the Desktops stored in the Asset Management section of the Service Desk.
In the Desktop Details following details can be found:
CMS / Domain : Here you can select the CMS under which you want to add CI type.
CI type: The type of CI can be defined here.
Name: This would be the name of the CI.
Impact: The impact can be selected here. Example: Affect Business, Affect user, etc.
Location: The location of the CI can be selected here.
Last Audit date: Here you get to see the date when the asset was last audited.
Risk: Here you can view and select the risk associated for CI.
Lifecycle status: Here you can see the lifecycle stage of the CI.
Disposition status: Here you need to select the disposition status
Asset department: Select the assets department here
Is Migrated (Migrated From): Here you can mention the details of migration.
Definitive Media Library (DML): Here you can add the Storage location and the Physical location of the Asset.
Description: Here you can add the details and description of the asset.
Legislation and compliance requirements: Here you can attach the documents for the legislation and compliance requirements.
Disposal regulations: Here you can attach the documents for the disposal regulations.
Privacy documents: Here you can attach the documents for the privacy documents.
Managed by: Select the staff who is responsible to manage the asset
Used by: Here you need to select the end user who uses the assets.
Assigned on: Select the date assignment date
Options on the right side of the Asset. (Within the Asset details)
Properties
CI details
Model: Here you need to add the model of the CI
Vendor: You can select the vendor here
Manufacturer: You can select the manufacturer here
Asset state: Select the assets state here
Asset tag: Select the Asset tag here
Serial key/Number: Add the Serial number of the Asset here
License Key: You can add the licenses key of the Asset here
Barcode: The barcode of the Asset can be seen here.
Warranty Year: The number of the years that the asset has warranty for is seen here.
Warranty Month: The number of the months that the asset has warranty for is seen here.
Installation date: Select the installation date
Acquisition date: Here you need to select the acquisition date
Warranty expiry Date: Select the warranty period here
Warranty date: Select the warranty expiry date here
Identification
Barcode: You add the barcode details here
QR code: You can add the QR Code details here
The tool facilitate the harvesting of licenses and data-wiping from hardware and mobile devices prior to the removal of those devices from use.
While placing a request for deleting an asset, you would get the option for Data wiping.
Financial details
Cost: The cost can be added here
Salvage: The Salvage cost can be added here
Depreciation type: Select the depreciation type here
Useful life: here add the useful life
Book value: will be shown here
Hardware details
IP address: Add the IP here
MAC address: Here you can add the MAC address
Subnet mask: Add the subnet mask
Operating system: You can add the operating system
Virtual memory: Specify the virtual memory
Total memory: Define the total memory
Service pack: Here you can mention the service pack
Service tag: Here you can mention the service tag
Processor details can be mentioned here
Name: Add the processor name
Manufacturer: Add the manufacturer name
speed: Mention the speed of the process
No.of cores: Mention the number of cores
Voltage: Define the voltage
Data Width: Mention the data width
Cache Size: Mention the L2 Cache Size
L3 Cache Size: Mention the L3 Cache Size
Processor ID: Mention the Processor ID
Revision: Add Revision here
Status: Add Status
Hard Disk details
Model: Add the model
Serial No: Add the Serial No.
Capacity: Add the Capacity
Network details
Nic: Add the NIC
IP address: Add the IP address
Subnet mask: Add the Subnet mask
Mac address
Gateway: Add Gateway
Is DHCP enabled: You can enabled and disabled DHCP here
DHCP address: Add the DHCP address
Keyboard details
Name: Add the name
Information: Add the information
Device ID: Add the device ID
Number of keys: define the number of keys
PNP ID: Add the PNP ID
Status: The status of the keyboard can be seen here.
Laptops: This would include a list of all the Laptops stored in the Asset Management section of the Service Desk.
Laptops Laptops: This would include a list of all the Laptops in thee Asset Management section of the Service Desk.
Virtual Hosts and VMs
The virtual machines and hosts would be added under this category.
Virtual Hosts
Virtual Machines
Asset Components
Services: The Assets listed under Services can be seen here.
Hardware: The Assets listed under Hardware can be seen here.
Consumable: The Assets listed under Consumable can be seen here.
Network: The Assets listed under Services can be seen here.
Document: The Assets listed under Services can be seen here.
Other: The Assets listed under Services can be seen here.
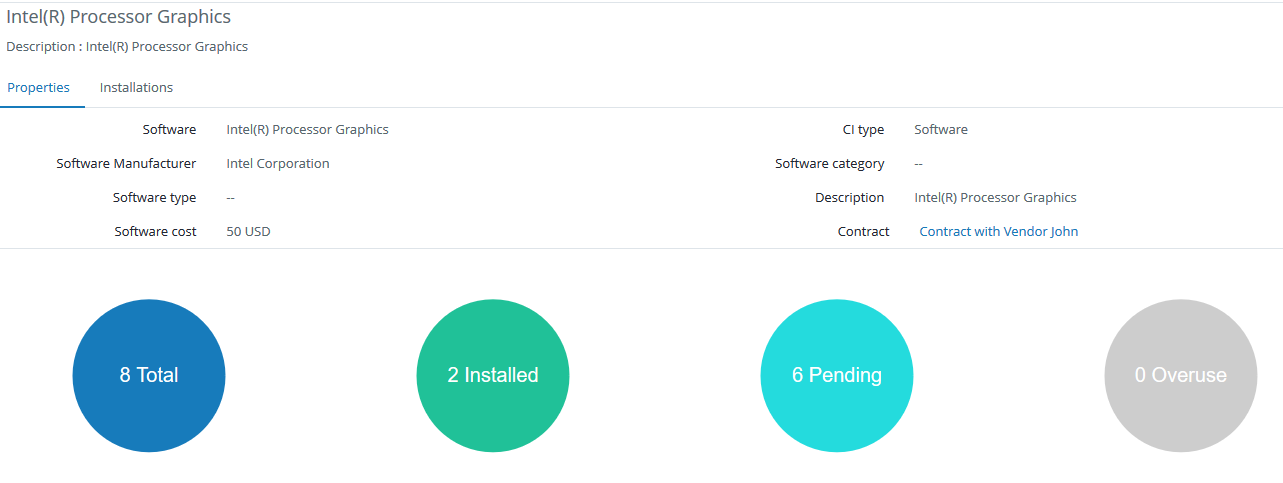
Softwares
Scanned Software: This would include the list of all the softwares scanned by the system.
Software Licenses: This would include the softwares that are attached to a contract.
Under a software you get to see the properties, description, contract and inventory for the same. You are also update on the available stock and used details. There is also a link to the contract with the vendor.
The tool facilitates the metering and usage of software licenses, the automatic ordering of additional licenses based on usage/inventory, the ability to identify under or over use of available licenses, and the ability to perform true-ups.
Barcodes
Barcode generation: Barcodes and QR codes can be generated for assets from here.
For new asset: Here you can generate the barcodes for new assets.
For existing assets: Here you can generate the barcodes for existing assets.
Print barcodes: You can print the barcode and QR code from here.
Inside a documented asset record.
Options on the left hand side inside an asset. After clicking on Edit
DESKTOP Name: This would include the name of the Asset.
Details
Domain: Here you can see the domain for which the asset is added.
CI type: The CI type would be displayed here.
Name:
Impact: Here you can check the impact that the asset has.
Location
Last audit date
Risk: The risk involved with holding an asset can be viewed / modified here.
Lifecycle status: The lifecycle status of an asset can be viewed / modified here.
Example - ordered, received, in storage, deployed, retired, and disposed, etc
Disposition status: The disposition status of an asset can be viewed / modified here.
Example: destroyed, sold, donated, lost or stolen, etc
Asset department: The department to which an asset belongs can be seen here.
Migrated from: Here you can add the details of the department or location from where the asset was migrated. We also offer a report to check the migrated assets - ‘Migrated asset report’.
Managed by: The staff who is managing the asset is seen here.
Is migrated: You can ticket this option and add the details if the asset is migrated from other place.
Definitive Media Library (DML)
Storage location: Here you need to specify the storage location of the Asset.
Physical location: Here you need to specify the actual physical location of the Asset.
Description:
Legislation and compliance requirements: Here you can attach the documents for Legislation and compliance requirements.
Disposal regulations: Here you can attach the documents for Disposal regulations.
Privacy documents: Here you can attach the Privacy documents.
Migrated from: Here you can add the details of the department or location from where the asset was migrated. We also offer a report to check the migrated assets - ‘Migrated asset report’.
Location: The location of the asset can be seen here.
Managed by: The staff member who would be managing the Asset.
Used by: The end user who would be using the asset can be seen here.
Assigned on: The date on which the asset was assigned can be seen here.
Last Audit date: The date on which the asset was last audited can be seen here.
Options on the right hand side inside an asset.
Properties
The properties of the assets would be displayed here. The properties include CI details, Financial details and Hardware details.
CI details would include details like the Model, Manufacturer, Barcode, Vendor, etc.
Financial details would include the cost and depreciation related details. This would include cost details for various asset related expenses like Hardware purchase, hardware maintenance, software purchase, software licenses, facility including utilities, personnel; Capital, operational, direct, indirect, fixed or variable costs, etc.
Hardware details would include all the configuration details like Processor details, Harddisk details, Network details, BIOS details, etc.
Installed software:
You can see the list of installed softwares here.
Audit log:
You can see the changes made to the properties of the asset right from the time it was procured.
Additional attributes:
Here you can add additional attributes.
Check-in/Check-out:
Contract:
Here you can see the contract associated with this asset.
Incident:
Here you can see the list of incidents linked with this Asset.
Depreciation schedule:
The depreciation schedule applied over this asset can be seen here.
Baseline:
The baseline contains the default value of the Asset and the Current value of the Asset. It helps us understand the upgrades or updates performed over the asset over its lifetime.
Options within an asset record on the top right corner of the screen.
Scan now: The scan now option can be used for intermediate scanning of the device. Scanning will start as soon as the asset agent starts at remote device.
Add Attribute: You can add a CI attribute from here. You need to add the name and value and then click on add.
Attach: You can define the asset relationship and inverse relationship here.
Example: depends on, hosted on, connected to, supported by,runs on,used by etc.
Check out: You can check-out and asset and pass a remark for it here.
ITIL Automation for Asset Management:
The ITIL Automation can be used to manage the automation for your Asset Documentation.
Options available under ITIL Workflow Events for Asset Management.
Workflows helps to automate the lifecycle management of all asset types.
Add Asset
Update Asset
On asset expired
Criteria conditions available for Assets Management under ITIL Automation.
CI Type
Asset state
Disposition status
Lifecycle status
Depreciation type
Vendor
Product
Manufacturer
License type
Asset department
Owner/Requester/Creator
Operator
Creation date
What is an asset?
An asset is any resource that is owned by the business. It can be tangible or intangible that can be owned or controlled to produce positive economic value.
Summary
IT Assets
Assets Summary:
In the Assets summary we get the entire overview of the Assets.
Asset status wise summary:
Here we can find the number of Assets in various statuses like In use, In Transit, In stock, Missing, Retired.
New updates:
All the latest updates done in the Assets will be listed here
Expired assets:
All the Expired assets done will be listed here
Asset billing summary:
Here we can find the billing summary of Assets like number of Active Contracts, Total contract amount, Used contract amount stock and Pending contract amount.
Notifications and alerts : All the Notifications that are related to the Assets can be seen here.
You can also use workflow and alerts to notify staff and user.
IT Assets:
Under IT Assets there are different IT related Assets like Workstation, Desktops, Laptops, Mobiles.
Workstation: To add a Workstation manually click on Add CI
Select the Domain and Select the CI type as Workstation and click on Next.
Name: Add the name of the Workstation
Impact: Select the impact here
Location: Here you need to select the location
Risk: Select the risk here
Lifecycle status: Here you need to select the lifecycle status
Asset department: The department for which the asset is allocated can be seen here.
Is migrated: You can tick this option if the asset is migrated.
Migrated from: You can add the name of the software here.
Roles for Asset management:
We have security controls in place to allow only authorized staff and users to view, open, modify, authorize and close asset records based on their role
The below options are available under roles.
Add: This option can be selected to allow the staff access to add an asset.
Delete: This option can be selected to allow the staff access to delete an asset.
Clone: This option can be selected to allow the staff access to clone an asset.
View: This option can be selected to allow the staff access to view an asset.
Update: This option can be selected to allow the staff access to modify or update the details of an asset.
Relationship management:
Scan now: This option will give the staff access to Scan the system for assets.
Network scan: This option will give the staff access to Scan the network for assets.
Add/Link software: This option will give the staff access to add / link a software to the assets.
Add/Update attribute: This option will give the staff access to add / update an attribute to the assets.
Import: This option will give access to your staff to import the list of assets into the Service Desk.
Export:This option will give access to your staff to export the list of assets into the Service Desk.
View Contract: The staff having this option enabled will be able to view the contracts associated with the asset.
Manage Contract: The staff having this option enabled will be able to manage or modify the contracts associated with the asset.
Add an Asset to the Service Desk
You can add an asset to the system manually by clicking on the option on the top right corner of the Asset page and clicking on “Add CI”.
Below are the fields that need to be filled while adding a CI / Asset.
Domain: In case you have added multiple domains, then you can select the domain under which you want to add the asset.
CI type: The CI type under which you want to add the asset can be selected here. Example - Hardware, Software, Services, etc.
Name*: You need to specify the asset name here.
Impact *: You have to specify the impact that the asset will have in this field. Example - Affect business, affect users, affect group.
Location: The location of the asset needs to be selected here.
Risk: The risk involved with holding the asset needs to be selected here.
Lifecycle status: The lifecycle status for the asset needs to be specified here. Example - Ordered, Received, Deployed, etc.
Asset Department:The department associated with this asset
Is Migrated:You can tick this option if the asset is migrated.
Last audit date: You can see the date for last audit of that asset.
Storage Location: You can see the storage location over here
Physical location: You can see the Physical location of that asset over here.
Software disposition status: This would be in case of a software. You need to specify the manner in which it is disposed. Example - Sold, Donated, lost, etc.
Description: The details of an asset can be added in the Description field. Documents and other files can also be added in the description. You can also add links in the description field.
Assignment
Managed by: This would be the staff who would be in charge of managing this asset.
Used by: This would be the client who is using the asset.
Assigned on: The assigned on date and time can be added here.
Note: The fields marked with star (*) are mandatory fields and cannot be skipped.
Name,Impact are mandatory fields.
Additional fields would be available while adding an asset as per the CI type selected. The below fields would be additional for Software and Hardware CI type.
Software Properties:
Installation date: Here you need to add the date when this software was installed.
Warranty *: You need to specify the warranty period of the asset.
License expiry date: Here you need to add the expiry date of the software license.
License type *: You can select the license type (i.e. Open Source or Commercial etc.)
Installation path: Here you need to specify the installation path of the Software.
License key: Add the license key here.
Cost: You can specify the cost of the software.
Version: Here you need to specify the version of the software.
Software Type: You can select the Software type.
Software Category: You can select the Software Category.
Manufacturer: You can select the name of the manufacturer.
Last audit date: Here you need to add the date when the last audit was done. Definitive Media Library (DML):
Storage location: Here you need to specify the location of the CI
Physical location: Here you need to specify the location of the CI
Hardware Properties:
Product *: The Product details of the Asset can be selected here.
Installation date: The date on which the hardware asset was installed.
Warranty *: You need to specify the warranty period of the asset.
Acquisition date: Here you need to specify the date when the asset was obtained.
Warranty expiry date: You need to specify the warranty expiry date of the asset
Asset state *: Here you need to specify the state of the Asset.
Asset tag: You can add the asset tag here.
Serial number: You can specify the serial number associated with the asset here.
Identification: You can specify the Barcode/QR code associated with the asset here.
Last audit date: Here you need to add the date when the last audit was done.
Depreciation details
Cost: You can mention the cost of the assets
Salvage: Here you need to mention the Salvage value of the asset i.e. the estimated resale value of the asset.
Depreciation type: you can select the depreciation type i.e. Straight-Line Depreciation Method
Declining balance Depreciation Method
Double Declining Balance Depreciation Method
Sum-of-the-Years-Digits Depreciation Method
Useful Life: Here you need to specify the useful life of the asset i.e. the period of time that the business asset will be in service and used to earn revenues.
Other Information
IP Address: Here you can specify the IP address associated with the asset
MAC Address: Here you can specify the MAC Address associated with the asset
Subnet Mask: Here you can specify the Subnet Mask associated with the asset
firmware revision: You need add the firmware revision here
Operating system: You can mention the operating system here
CPU (in MB): This would be the CPU in MB.
IOS: You can mention the IOS here in case of if the asset use IOS as operating system
Flash Size (in MB): You can mention the flash size here
NVRAM Size (in KB): You can mention the NVRAM size here
DRAM Size: You can mention the DRAM size here
CPU Type: You need to specify the CPU type
CPU revision: You can mention about the CPU revision
Config register: You can specify the config register
Processor or board ID: You can specify the Processor or board ID
Definitive Media Library (DML):
Storage location: Here you need to specify the location of the CI
Physical location: Here you need to specify the location of the CI
Description: You can add more description of the CI here. The editor window of the Description field includes the following options. HTML, Link, Undo, Redo, Add attachments, fullscreen.
Note: The attachments in Description field can be used for the storage of electronic versions of physical documentation, such as purchase orders, receipts, proofs of purchase, receipts, COA's, documents of destruction, electronic and digital asset documentation and information etc.
Assignment Managed by: you specific the staff who manages this particular CI Used by: you can specify the customer/ end user who uses this particular CI Assigned on: Specify the date when this CI was assigned on Add: click here to add the CI
Reports related to Asset Management.
We understand the importance of Reporting in Asset Management and have therefore tried to include the most relevant ones in the system. To ensure that we do not miss anything, we have provided you with two types of reports.
Predefined Reports
Custom Reports
The Predefined Reports are available under Reports >>> All Reports >>> Assets Predefined Reports are the standardized reports that are available under various modules in All reports section. The predefined reports can be used as a ready reckoner for quick reference to conduct a defined analysis.
You can schedule a report to be generated at regular intervals and also define the format in which you want the same to be exported. Example - xlsx, html, csv, etc.
Below are the list of predefined reports that we offer in Asset Management.
Incident CI relation - This report will help define the Incident CI relation, i.e. CI’s linked with an Incident.
Assets used by client - This report will give the details of the assets used by a client.
All guest asset - Here you will get a report for all guest assets.
Assets managed by staff - Here you will get a report for the assets managed by a staff.
Assets linked to incidents - Here you will get a report for the assets linked to an incident.
Asset link to problems - Here you will get a report for the assets linked to a problem.
Assets expiry report - Here you will get a report for the assets which have expired.
Assets group by state - Here you will get a report for the assets grouped by state.
Asset grouped by location- - Here you will get a report for the assets grouped by location.
Assets by asset type - Here you will get a report for the assets by asset type.
Asset by asset product - Here you will get a report for the assets by asset product.
Hardware assets by state - Here you will get a report for the hardware assets by state.
Assets by depreciation - Here you will get a report for the assets as per the deprecation applied.
Assets depreciation notification - Here you will get a report notifying the depreciation applied.
Asset by manufacturer report - Here you will get a report for the assets by manufactures.
Asset baseline report - Here you will get a report for the asset baseline, which would show the changes in an asset.
Asset department report - Here you will get a report for the asset as per department.
Asset report - Here you will get a domain wise report for assets.
Migrated asset report - Here you will get a report for the assets migrated from other location.
Unauthorized changes to asset - Here you will get a report for unauthorized changes made to assets.
Contract report - Here you will get a report for the contracts linked with an asset.
Unauthorized assets can be detected which are not linked with contract and can be removed from the system.
There is an option to auto remove unauthorized assets using cron job.
There is an option to auto remove unauthorized copies of software and licenses.
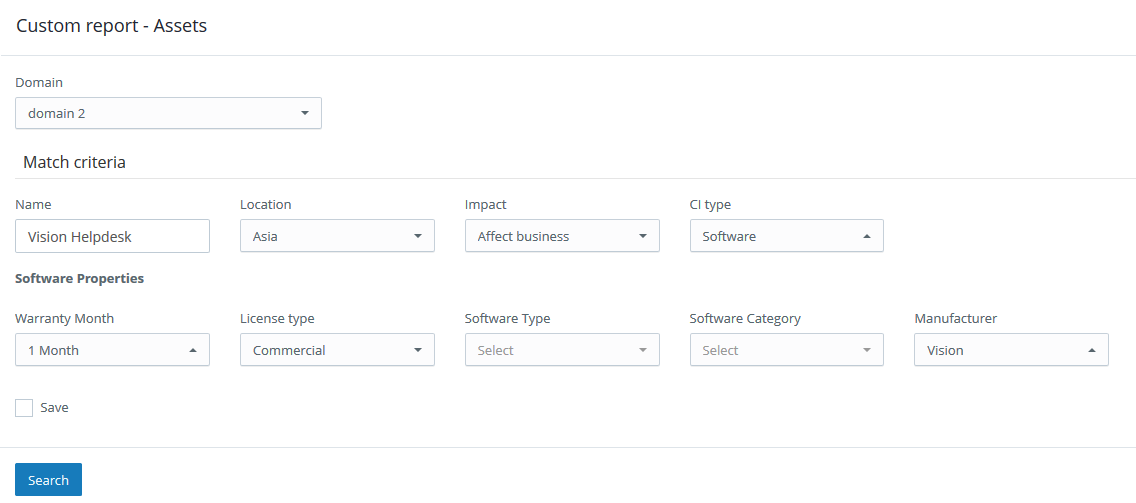
Although we have tried to cover the most relevant report types in the Predefined reports, it is not possible to include everything. Therefore to fill this gap we have provided you with the Custom reports.
The custom reports / ad hoc reports can be generated based on Asset name, location, impact and CI type. Please refer to the below screenshot to get an idea about it.
To access the custom reports, click on the option on the top right corner of the page and select “Create custom report”.
Audit Logs / historical records
We offer the feature of Audit logs on the Assets where we can add historical records . The Audit log field contains the details of all the changes made to the asset from the time it was procured.
Asset Management Settings in Admin Settings:
Using the CI types the tool can integrate with Configuration Management Databases (CMDB)
CI type: The CI types for the Asset can be added here. Example: Hardware, Software, Service, document, etc. Custom fields can be used to define predefined and user configurable fields on the basis of CI type. You can add custom field type as Text box, Checkbox, Multiple select box, etc.
Asset state: Here you can add the asset states. Example: In use, In transit, in stock, missing, retired, etc.
License type: The list of license types can be added here. Example: Open Source, Commercial, freeware, etc.
Software type: The list of software types can be added here. Example: enterprise, network, named, concurrent, subscription,etc.
Software category: The list of software categories can be added here. You can also define if you want this category to be visible to a particular domain or for all domains.
Manufacturer: The list of product manufacturers can be added here. These can be added domain wise.
Model: The list of product models can be added here. These can also be added domain wise.
Vendor: The product vendors can be added here.
Product catalog: You can add the list of products under the product catalog.
Product status: This would define the status of the product. Example: In production, in pipeline, retired, etc.
Mode of procurement: Here you can add a list of mode of procurement for the asset. Example: buy, lease, etc.
Depreciation type: The type of depreciation to be applied on an asset can be selected here.
Contract type: Here you can add the type of contract that is associated with the Asset Some of the examples are Lease, Software, Maintenance etc. To Add Contract type click on the top right filter list.
Title: give a title for the type of contract
Description: type the description here
Display order: You can define the display order for the contract type here.
Domain access: Here you can give the access of a specific or all the domains.
Status: You can enable and disable the status here.
Add: click here to add the new contract type
Auto Discovery: The auto-discovery option can be used to scan a machine or a network.
The tool facilitate integration with external discovery tools for the population and updating of asset records and attributes from multiple data points and sources; and enabling the ability to perform event monitoring of these assets.
Details to be filled are as below.
Select domain *: You can select the domain name here.
Registration key *: The registration key will be auto-fetched by the system.
Operating system *: You can select the Operating system here. (Linux, Windows or Mac OS)
Download type *: You can choose the download type among ‘Agent’ and ‘Probe’.
Please refer to the below details as per the Operating System for which you download the file.
Linux : Download vhd_linux_agent.py file , and get the registration key for Linux device. Save file on Linux drive and execute it through terminal.
It requires Python 3.X and above and Python's request module.
vhd_probe.py is used for network scanning.
It requires employee login details and Linux module arp-scan.
Windows - Download vhd_win_agent.exe file , install it on windows OS. Staff credentials and add registration key. It works with windows 7 and above.
It requires MS.Net framework 4.5 and above.
vhd_win_probe.exe file is used for network scanning.
Mac - Download vhd_mac_agent.py file , and get the registration key for Mac device. Save file on drive and execute it through terminal.
It requires python 3.X and above and Python's request module.
Mobile apps - Asset tracking mobile apps are available for android and iOS devices at google play store and iTunes respectively.
Lifecycle status: Here you can find or add the lifecycle status for the Assets such as ordered, received, in storage, deployed, retired, and disposed.
Disposition status: Here you can find or add the disposition status for the Assets.
Some examples are Sold, Donated, Lost, Destroyed etc.
To Add Disposition status click on the top right filter list.
Title: give a title for the disposition status.
Color: you can select the color here.
Description: type the description here
Display order: You can define the display order for the disposition status of the Assets here.
Domain access: Here you can give the access of a specific or all the domains.
Assets: Here you can give the access of assets in a specific or for all the domains.
Status: You can enable and disable the status here.
Add: click here to add the new disposition status.
License control: Here you can find or add the License control status. Some examples are Available for distribution, Distributed and consumed, Harvested for re-use, Re-allocated, End-of-license removal etc. To Add License control status click on the top right filter list. Title: give a title for the License control status.
Color: you can select the color here.
Description: type the description here
Display order: You can define the display order for the License control status.
Domain access: Here you can give the access of a specific or all the domains.
Assets: Here you can give the access of assets in a specific or for all the domains.
Status: You can enable and disable the status here.
Add: click here to add the new License control status
Asset department: Here you can add the department to which the Asset belongs
Title: give a title for the Asset department.
Description: type the description here
Display order: You can define the display order for the Asset department.
Domain access: Here you can give the access of a specific or all the domains.
Status: You can enable and disable the status here.
Add: click here to add the new Asset department.
Integration or federation with external systems
General Ledger: Here you can add the general ledger from the admin settings.
The below fields are available.
Expense type* : Here you can select the expense type
Cost model * : You can specify the name of cost model.
Description* : You can define the description of ledger.
Account number* : You can define the account number of ledger
Account Name* :You can define the account name of ledger
Amount* :You can define the amount .
Location: You can define the location of ledger
Asset Module Settings: (These settings are available under Admin Settings >>> System >>> Module)
The below details can be modified here.
Title *: This would be the title for the module.
Header title: This would be the header title.
Ongoing audit: You can mark this field as a Yes or No. This option is for freezing the changes made to the assets. You cannot modify or add an asset during an ongoing audit. No asset records are added, updated or removed from the time a notice of audit is received until the completion of the audit.
Auto mapping of software-contract: Select Yes, if you want the software asset to be mapped when a contract has been added for the same.
Update: Click on update to save the changes made above.
Auto-Discovery in Asset Management:
The Auto-discovery can be used to scan the assets within a system or a network and add the details in the asset management section of the Service desk.
The auto discovery tool can be downloaded from Admin Settings >>> Assets >>> Auto Discovery
The auto discovery file needs to be downloaded and installed on a particular machine to scan the machine or the network. You can also choose between Linux, Windows and Mac OS for the auto discovery setup file format.
Once the setup file has been installed on a computer, you can run the same to scan the assets in a network or within a computer.
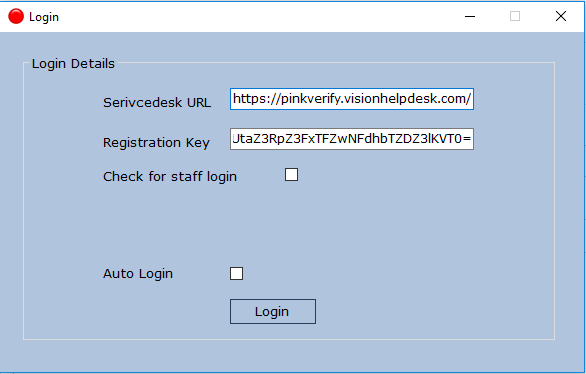
You need to add the Service desk URL and the registration key to login.
Notes:
The service desk URL would be the client portal URL ending with a slash (/)
The registration key can be found under Admin Settings >>> Assets >>> Auto Discovery.
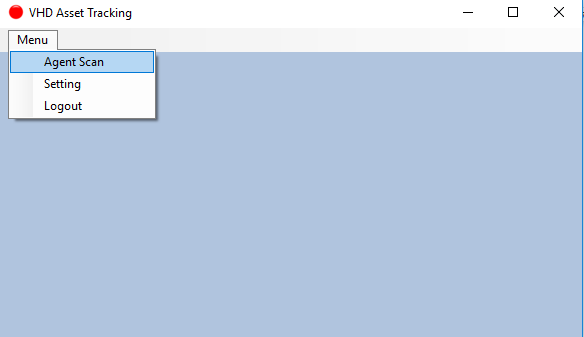
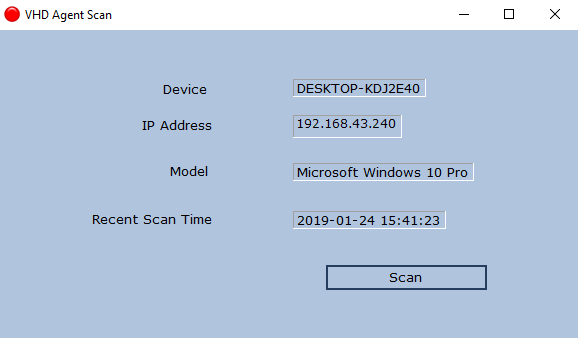
Once you have logged into the Asset Management tool, you would get the option for Agent Scan (single machine)/ Network Scan.
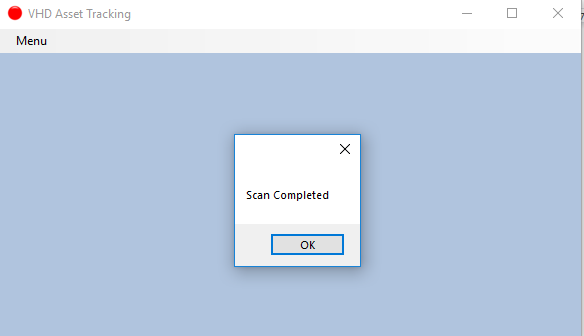
On selecting on Agent / Network Scan, you would get a message when the scanning has been completed.
The scanned asset details would then be visible under Asset Management.
Archiving Asset Records.
You can archive the asset records and keep only the required ones in the asset management folder.
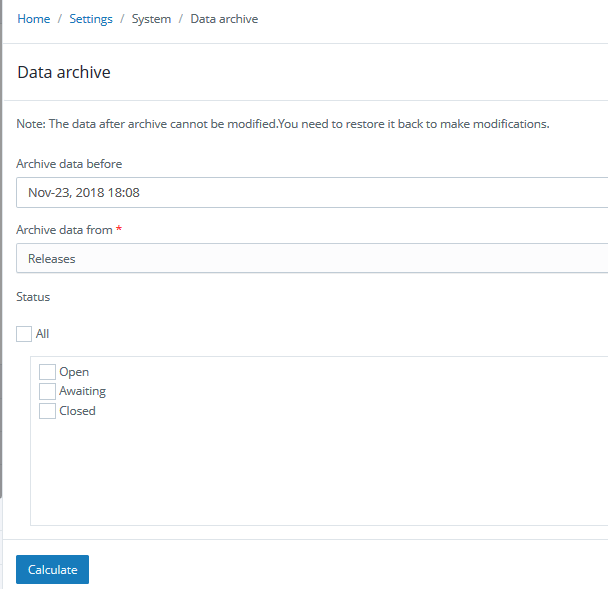
To Archive an asset record, click on Admin Settings >>> System >>> Archive
The above image illustrates the steps to add archive an asset request.
Click on the option on the top right corner of the page.
Click on Settings.
Click on Archive.
The below details need to be selected under the Archive option.
Archive data before: Here you can define the date before which you want to archive the asset records.
Archive date from: You need to select the option “Assets” here.
Status: Here you can define if you want to archive the Assets belonging to a particular status.
Then click on Calculate.
You would get Total data count to be Archived.
Then click on Archive
Note: The data after archive can be viewed in the Archive folder under asset management, but cannot be modified. You need to restore it back to make modifications.