What are the Admin Settings for Clients Module?
Admin is also a staff member with separate credentials to log in. The admin settings can only be accessed by the admin credentials through the staff portal. Once you log in, in the settings you will find system settings displayed clubbed together function-wise, for eg. systems, module properties, user, automation, etc. You can access client module settings and you can also update it as per your requirement.
Below settings need to be explained with screenshots.
1. Home > Settings > System > Module > Client module
You can choose to modify the client related admin settings from Admin settings>>System>>Module>>Client module. When you click on the client module you will be redirected to the client admin settings page. If it is a satellite or enterprise helpdesk, you need to select the domain before updating the settings.
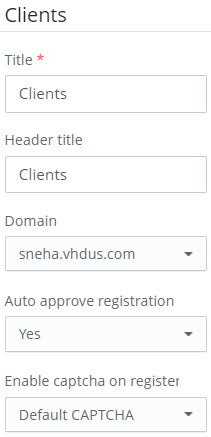
Auto approve registration ensures that new clients that submit queries from various channels get auto registered in the system. If this setting is disabled, clients will have to register themselves first and then post their query. Captcha on registration is provided as an additional level of security. You can choose between default captcha and google recaptcha.
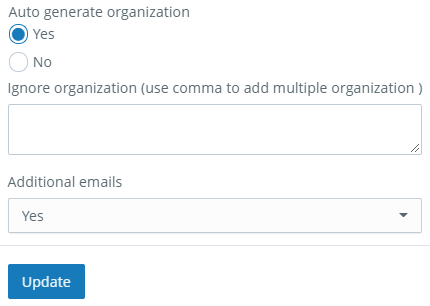
Auto generate organisation is a function which allows clients submitting queries from their professional email addresses which contain the same domain name to be grouped together and form an organisation. For example you are providing customer support to SBI bank, employees of the bank will be submitting you queries from name@sbi.com email address. Enabling auto generate organization will result in creation of a new organisation in the system by the name sbi.com listing all the query submitting employee’s email addresses as clients. Under ignore organisation you can add the domain names you do not wish to be added under any organisation as these can be generally used by everyone. For example gmail, rediff, etc.
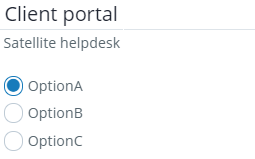
2. Home > Settings > System > Client portal
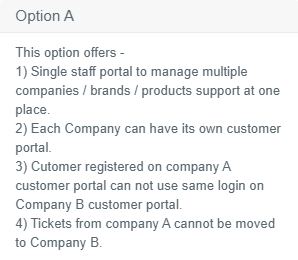
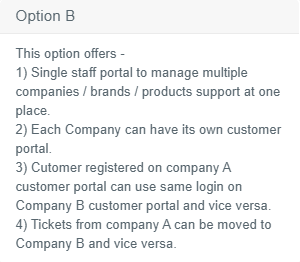
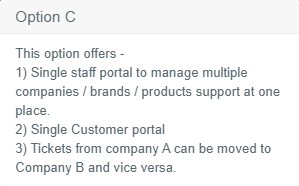
The client portal is a point of contact for the clients to register in the system and submit queries. Through this portal a client can also view his previously submitted queries and draw reports based on them. You can modify the settings related to the client portal through admin settings>>System>>Client portal. If it is a satellite or an enterprise help desk, you can choose between options A, B and C based on the level of separation required among your brands. With option A being the most and option C with the least separate.
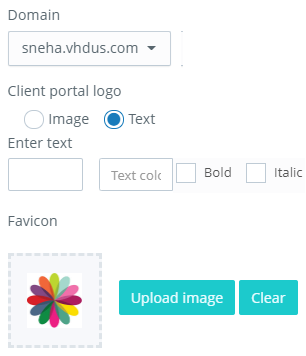
It is important to select the appropriate domain name before you start updating changes made. The client portal logo is displayed on the client portal where the clients can register themselves and submit queries. This logo can be an image or a text as per your choice. A favicon icon is the icon displayed on the address bar of a browser accessing the site.
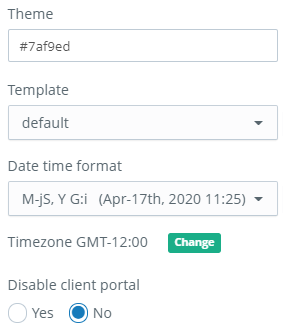
The theme of the client portal can be modified from the spectrum of colours available in the system. If your organisation has a template it can be added from here. The time zone of the client portal can also be modified from this page.

From display pages you can specify whether an option should be displayed on the client portal or not. Additionally some options have a preference to be displayed only after the client logs into the portal. As all the options are self explanatory you just have to decide which options to be displayed and under which condition.
You can also specify which page to display before and after a client logs in to the client portal. It can be chosen from home, solutions, forums, login and submit incident page.
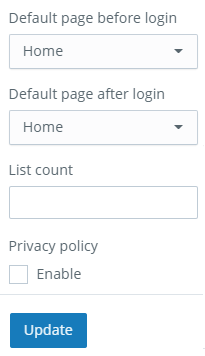
A client can login to the client portal and view his previously submitted tickets. From the list count here, you can specify how many tickets should be displayed at a time. If there are multiple pages, using pagination the client can shuffle between these pages. Depending on your requirement you can also add a privacy policy.
3. Custom fields for client registration page
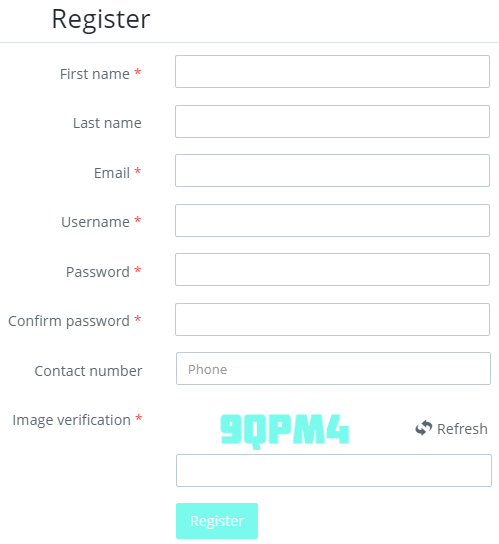
The client related settings can be modified from the client module and client portal settings as mentioned above. Before these settings come into picture, an important function that regulates overall client availability in the system is the client registration page. A client registration page has values that capture data from the client end during their registration in the system. Default values for client registration include first name, last name, email address, a username which enables the client to log in to the system and a password to compliment it followed by contact number and captcha for additional security.
In addition to these default fields, you can also add custom fields of your choice. Through admin settings>>customisation>>custom fields you can choose to add additional custom fields through which you can capture additional information from the client end.
When you land on the custom fields page, from the more list icon

on the top right corner of the screen you can add a custom field group. Only after adding a custom field group can you add a custom field.

There can be numerous custom fields added under a custom field group. Depending upon your requirement, there is a list of options available which can be used to extract necessary information from the client end.
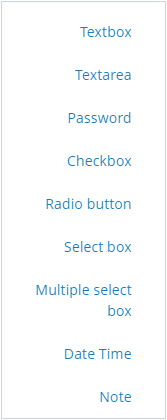
The custom fields that can be added are self explanatory. For example,
You have to select the domain name if you have multiple domains. We also have a provision of enabling auto approved registration. When you enable auto approve registration, any new client submitting a query for the very first time gets automatically registered in your system. A link will be sent on his registered email address or contact number through which the registration process can be completed as well as the ticket status can be monitored.
You can also enable or disable captcha during registration. This captcha can be either default or google powered. Auto generate organisation is another option that you can enable or disable from the settings here. If you wish to create a new organisation for the clients who are submitting tickets from a particular domain name like XYZ@yourdomainname.com, you can choose to auto generate an organisation where the clients will be automatically grouped depending on the criteria specified. When you select auto generate organisation, a text box appears where you can mention the domain names of the clients you do not wish to be added. These clients will land up in default organisation.
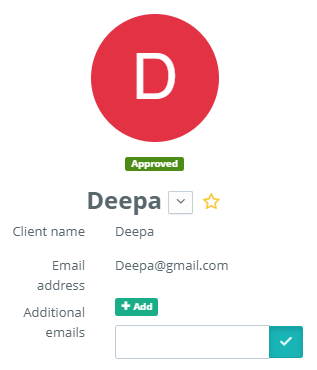
A client is associated with his contact information, like his mobile number or email address. In general, people can have more than 1 email address. If a client wishes to submit queries through a different email address than what has been registered in the system, additional email addresses should be used. When you enable additional emails, under the client details you will find an additional field where you can add an additional email address.