

Inside a ticket
When a client submits a query, it is raised as a ticket in the system. When you log in to the staff portal, you will find this ticket under new incidents. If the admin has assigned this ticket to a staff member, when this staff logs in it will appear under assigned incidents.
When the assigned ticket is opened by the staff member, the details of the ticket are displayed inside. Inside a ticket you would see a left hand panel and a ticket listing board on the right. Under the left hand panel you can see the details of the client who has submitted the ticket.

From the edit icon beside the client name you may choose to edit the client details saved in the system. The changes will be saved in the system.

Below the client details you can find the SLA that has been applied to this particular ticket.

You can see the name of the SLA and time left before the status of the ticket turns overdue. If the staff has responded back to the client within the response time, the status of response time would be changed to ‘undue’ until further communication takes place.
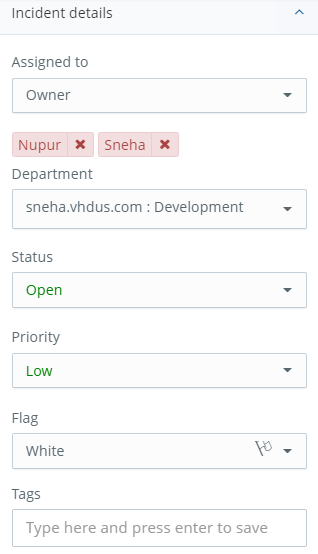
Below the SLA you will find the details of the incident. In the incident details under assigned to section you will see ‘owner’ displayed if the incident is already assigned to a staff member. Below this drop down menu you will also see the names of the staff assigned this incident. You can also see the department this ticket was raised into along with its status, priority, flag and tags. If you have the access rights you can edit the details of the incident from this section.
Below the incident details section you will find the section which displays the additional fields associated with the client who has raised this ticket. These additional fields are the custom fields added on the client registration page in order to capture additional data from the client end.
At the end of the left hand panel below the incident details you will find the recipient and people section. You will find the primary email address of the client through which this incident was submitted under the recipients section and if there are any additional email addresses under CC, these are displayed under the people section.

On the right hand side of the screen on the top you can see the ticket details such as the ticket subject, labels applied to the ticket, the unique ticket hash followed by a symbol specifying the channel through which this incident was created and the date and time of this incident creation.

Below these details you can find various tabs through which you can view additional information about the ticket. Under the conversation tab you will find all the conversation posts between the end user and the staff. The audit log has a list of all activities carried out on the ticket from the date of creation. For eg. assigned to which staff, if the SLA has been changed, which staff has responded back, any property of the ticket is modified, etc.

Under the history tab you will find all the tickets submitted by this client. This option enables the staff to access previous tickets submitted by the same client. If you choose to add Client note or incident note, an additional tab opens up where you can find the note displayed. Sometimes while working on the client query, a staff may require approval from their colleagues, supervisor or even the client. This requirement is catered by the function called approvals. Using this option an approval request can be raised and the approver will receive an email as well as a notification in the system.
In order to respond back to a client query you have two options to choose from. You can either select to reply with a quote or without a quote. When you choose to respond back with a quote, the response will contain the previous conversation posts between the staff and the client. When a response is not sent it is signified by a cross symbol

on the top right corner. If the response has been sent from the system but not yet received at the client end, it is signified by a single tick icon

on the top right corner of the post. When the sent post is also received by the client, such posts are symbolised by a double tick icon on the top right corner of the post.
The option to reply back with a quote can be accessed from the top right corner of the same post you wish to include as a quote in the reply. From the drop down list available under the reply icon on the top right corner of the post, you may choose to reply back with a quote, forward the post to a third party email address, edit and delete the post in the system.

The last option being split which enables you to split posts displayed under the conversation tab. There has to be more than one post available in order to split the ticket. This post can be split from the original ticket to form an entirely new ticket or split into another ticket.
If you wish to choose to reply without a quote, from the top right side of the screen you can choose reply option to respond back to the client where a fresh response can be drafted.

Using reply-all option, you can send a common response to the email address of the client through which the ticket was raised as well as to the additional email addresses added under CC(carbon copy). In this way everyone in the conversation can be kept in the loop. Using the forward option you can forward this ticket to a third party email address.
On the top right corner of the screen just beside the reply option you can find the time tracker icon. This is a useful function under the billing module where it helps to keep a track of time spent by the staff members to resolve a client query.

Using start and stop timer you can allow the system to keep a track of all the time spent by every staff who has worked on the ticket. In the backend the system adds up the time track entries of different staff members and an invoice is generated at the end of the billing period. Using the second option of ‘add time tracked’ you can manually add the cumulative time spent by your staff members to resolve the client query mentioned in the ticket.
Beside the time tracker you can find the labels icon

which allows you to access the list of labels available in the system. Labels are used for additional categorisation of tickets and from this option you can apply any label to the ticket. You can also add custom labels from the admin settings and from this option you can apply them to a ticket.

There is an anti collision detection system available in the system. Beside the labels option there is a open lock icon

that symbolises that nobody is working on this ticket. The collision detection makes sure that no two agents are working on the same ticket causing duplication of work. When a staff member starts working on a ticket he can switch on the collision detection by clicking on the open lock symbol and other agents will see a closed lock icon

and below that the name of the agent working on the ticket. This way the staff comes to know if an agent is already working on it. The collision detection mechanism can also be automated through admin settings where every time an agent opens a ticket and clicks on the reply option the agent collision is switched on.On the top right corner of the screen is the more list icon

through which you can access a list of operations that can be performed on a ticket.

Using the apply SLA option you can manually add a custom SLA to a ticket or apply a predefined one. Once a new SLA is applied, you will find the details reflected under the left hand panel below SLA. Notes can be added on a ticket using the add note option. There are two types of notes that can be added, namely incident note and client note. An incident note can be applied to an incident whereas the client note is applied to all the incidents submitted by a client. For example, an incident note can be additional information about the query mentioned in the ticket whereas a client note can be additional details of the client. Using clone incident you may choose to create a duplicate incident with a new incident hash. This cloned incident can be used to report a similar incident from another client. Using the option add symptoms, after studying the query mentioned in the incident you can manually add symptoms which can be useful in pointing out the perceived change. Adding a symptom is the same as adding a note, just that a symptom will be added below the subject of the ticket. Using create invoice you can create a fresh invoice.
Link or add task is an option through which you can divide the query mentioned in the ticket into smaller tasks that can be easily executed by the staff members. If you have a predefined task you can add it to the ticket using the link option or you can create a new task using add task. You may also choose to link an incident to other incidents and define the relation between them. This option is particularly useful when it is important for the staff to consider other incidents before coming up with a solution.
Request for approval is a feature which allows the staff members working on client query resolution to ask for approval. This approval request may be sent to a colleague, supervisor or a client who will be notified through system notification and email. If the request is designated to a colleague or a supervisor, they can respond back through the staff portal whereas the client can respond back through the client portal. Merge incident is a function through which you can merge two incidents into one. For example if an incident A is merged to another incident B, then the incident A will cease to exist altogether. All the data in the incident A will be reflected in the incident B. If the same client submits two different incidents, using this option you can merge them both. This will allow the staff to send a single unified response to the client.
Using the move to trash option you may choose to move an incident to the trash folder. In the inbox under the left hand panel in filters you can find the trash folder as a predefined filter. Using the mark as spam option you can mark this particular ticket as spam. This will lead to this ticket being moved to the spam folder. This spam folder can be accessed from the inbox, under the left hand panel in predefined filters. You can also ban a client from sending you queries in the future by using the ban option from this list of operations that can be performed on a ticket. If you wish to export the ticket in portable format you can use the export to PDF option. A PDF copy is generated where the incident details are displayed and it can be shared on various platforms of your choice. This PDF is named after the incident’s unique hash number.